Two ways to show the business is yours
When you claim a listing on BizScoreAI, we ask you to show that you run the business. This step keeps anyone else from taking over your listing. You only need to do one of the two options below.
Get a code by email
We send a 6-digit code to an email address at your business website, such as [email protected]. Enter the code and the listing is yours.
Add one DNS record
No email at your website's address? Add one short line of text, called a TXT record, to your domain's settings. We check for it, and the listing is yours.
Option 1: the email code
This is the quickest way. It works when you have an email address that ends in your website's domain.
- Find your business on BizScoreAI and click Claim This Business.
- Create your free account with your name, email and a password.
- In Step 2, type an email address at your business website's domain and click Email me a code. If your website is yourbusiness.com, any address that ends in @yourbusiness.com works.
- Open that inbox, find the email from BizScoreAI, and type the 6-digit code into the box. Click Verify code.
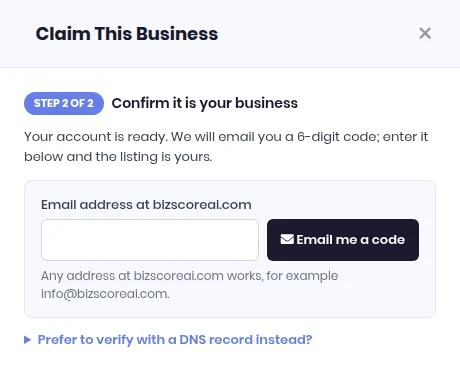
The code works for 30 minutes. If it runs out, ask for a new one.
Why a Gmail, Yahoo or Outlook address will not work
Anyone can open a free Gmail, Yahoo or Outlook account in a minute, under any name. So an address like [email protected] does not show that you run the business. An address at your own website's domain does, because only the business controls it. That is why the code can only go to an address at the domain on your listing.
If your business only uses a free email account, use Option 2 below instead.
Option 2: the DNS TXT record, step by step
This sounds technical, but it is a short copy and paste.
What is a DNS record? Every website address, like yourbusiness.com, has a settings page. It lives with the company where you bought the domain, or with the company that runs your website. That page holds a short list of records that tell the internet where your website and email are. A TXT record is simply a line of text you add to that list.
Adding it does not change your website or your email. We only look for the text to confirm that you control the domain.
Get your record from BizScoreAI
Click Claim This Business on your listing and create your account. In Step 2, click Prefer to verify with a DNS record instead? Your record opens underneath.
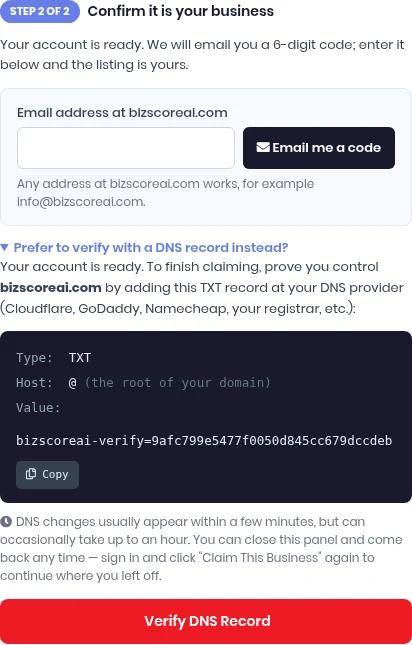
If you started your claim from the Claim Your Listing page, the same record shows as soon as your account is created:
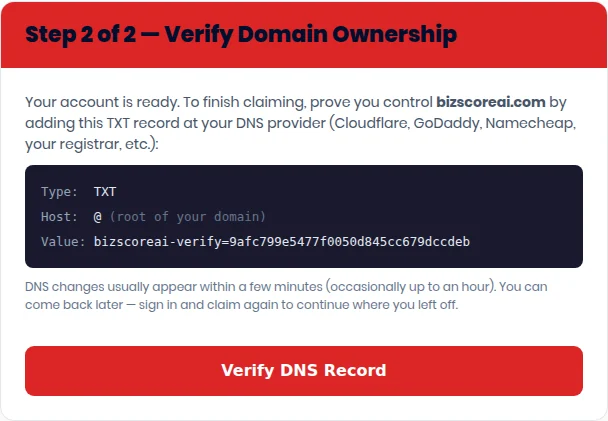
These are the three parts you will enter at your domain company:
Copy the whole Value, including bizscoreai-verify= at the start. Every claim has its own code, so use the one shown in your account, not the one in our pictures.
You can leave this page open, or close it and come back later. When you sign in and click Claim This Business again, your record is still there.
Find where your domain is managed
This is usually the company you pay each year for your website address. A few ways to find it:
- Search your email for a domain renewal notice or receipt. The sender is usually the company you need.
- If you built your site with Wix or Squarespace and bought the domain there, it is managed there.
- If someone else built or runs your website, ask them. Send them the three parts above and they can add it for you.
Add the TXT record
Sign in at that company and open the DNS settings for your domain. The menu may be called DNS, DNS Records, Manage DNS, Advanced DNS or Zone Editor. Then:
- Click Add record (or Add New Record).
- Set Type to TXT.
- In the Host box (some companies call it Name), type
@. If the box will not accept @, leave it empty. Do not type www. - In the Value box (some call it Content, Data or Text), paste your full value.
- Leave TTL on its default setting.
- Click Save.
Steps for the most common companies are further down this page.
Come back and click Verify DNS Record
Go back to your claim and click Verify DNS Record. New records usually show up within a few minutes. Now and then it takes up to an hour.
If we do not see it yet, you will get a message saying so. Nothing is lost. Wait a little and click the button again. Once we find the record, the listing is yours and we take you to your account.
Steps for common domain companies
Pick the company that manages your domain. Menu names change from time to time, so each one links to that company's own help article.
Cloudflare
- Sign in to Cloudflare and click your domain.
- Open DNS, then Records.
- Click Add record and choose TXT as the Type.
- Name:
@. Content: paste your value. - Click Save.
GoDaddy
- Sign in and open your Domain Portfolio.
- Click your domain, then DNS.
- Click Add New Record and choose TXT.
- Name:
@. Value: paste your value. Leave TTL as it is. - Click Save.
Namecheap
- Sign in and click Domain List, then Manage next to your domain.
- Open the Advanced DNS tab.
- Click Add New Record and choose TXT Record.
- Host:
@. Value: paste your value. - Click Save all changes.
Squarespace Domains (including domains that were with Google Domains)
- Open your Squarespace Domains dashboard and click your domain.
- Click DNS in the side panel.
- Click the + button to add a record and choose TXT.
- Name:
@. Data: paste your value. - Click Save.
Wix
- Go to the Domains page in your Wix account.
- Click the Domain Actions icon next to your domain and choose Manage DNS Records.
- In the TXT section, click + Add Record.
- Host Name: leave it empty (Wix uses empty for @). Value: paste your value.
- Click Save.
If your domain is only pointed to Wix and was bought somewhere else, add the record at the company where you bought it.
IONOS
- Sign in to IONOS and go to your list of domains.
- Click the gear icon next to your domain and choose DNS.
- Click Add record and choose TXT.
- Host name:
@. Value: paste your value. - Click Save.
Bluehost
- Sign in to the Bluehost portal and click Domains.
- Choose your domain and open the DNS tab.
- Under Manage Advanced DNS Records, click + Add record.
- Choose TXT. Host:
@. Value: paste your value. - Click Add.
HostGator
- Sign in to the HostGator Customer Portal and click Domains.
- Choose your domain and open the DNS tab.
- Click + Add Record, then choose a single record.
- Choose TXT. Host:
@. Value: paste your value. - Click Add.
Google Workspace
Google Workspace runs your business email, but your domain's DNS is managed by the company where the domain is registered. Add the TXT record there, using the steps for that company above.
Google's own guide shows how to find that company and add a TXT record there. Follow it with our Host and Value instead of Google's.
Not on this list? Search your domain company's help pages for "add TXT record". The steps are almost always the same: Type TXT, Host @, paste the Value, Save.
More than one location
One BizScoreAI account can hold every location you run. Claim each listing while signed in to the same account, with the same email and password.
- With the email code: the same business email address works for each location that shares your website.
- With a DNS record: each location has its own value. If your locations share one website, add each value as its own TXT record on that domain. They can all sit there together.
Every location you claim then shows up in your account.
If something does not work
"We could not find the TXT record yet"
- Give it a few more minutes, then click Verify DNS Record again.
- Check that you copied the whole value, starting with
bizscoreai-verify=, with no extra spaces. - Check that the Host is
@(or empty), not www or anything else. - Check the domain name. We look at the domain shown in Step 2, which comes from the website on your listing.
I added the record, but it still is not found after an hour
Some domains are registered at one company while a different company runs their DNS. For example, you bought the domain at GoDaddy, but your website company or Cloudflare manages its records. A record added in the wrong place is ignored. Add it where your other records already live, such as the ones for your website and email.
The listing says it is already claimed
If you claimed it before, sign in to your account to manage it. If you did not claim it, contact us and we will look into it.
I have no business email and cannot get into my DNS settings
Ask the person or company that runs your website to add the TXT record for you. Send them the Type, Host and Value from your claim. If that is not possible, contact us and we will help.
Ready to claim your listing?
Find your business, click Claim This Business, and pick the option that suits you.
Find your business